Chapter 4
Chapter 4 — Desktop GUI tour
Launching thclaws with no arguments opens the native desktop app: a wry webview wrapping a React frontend that talks to the same Rust agent core as the CLI. This chapter is a guided tour of the main window — read it once so you recognize every UI region when you need it.
If you only ever use the terminal REPL, you can skim this chapter and move on. Everything the GUI does is also available via slash commands.
First-launch setup — the first time you open thClaws you’ll see two modals in sequence (pick a working directory, then pick where API keys are stored). Both are covered in chapter 3. This chapter assumes you’re past them.
The main window — layout
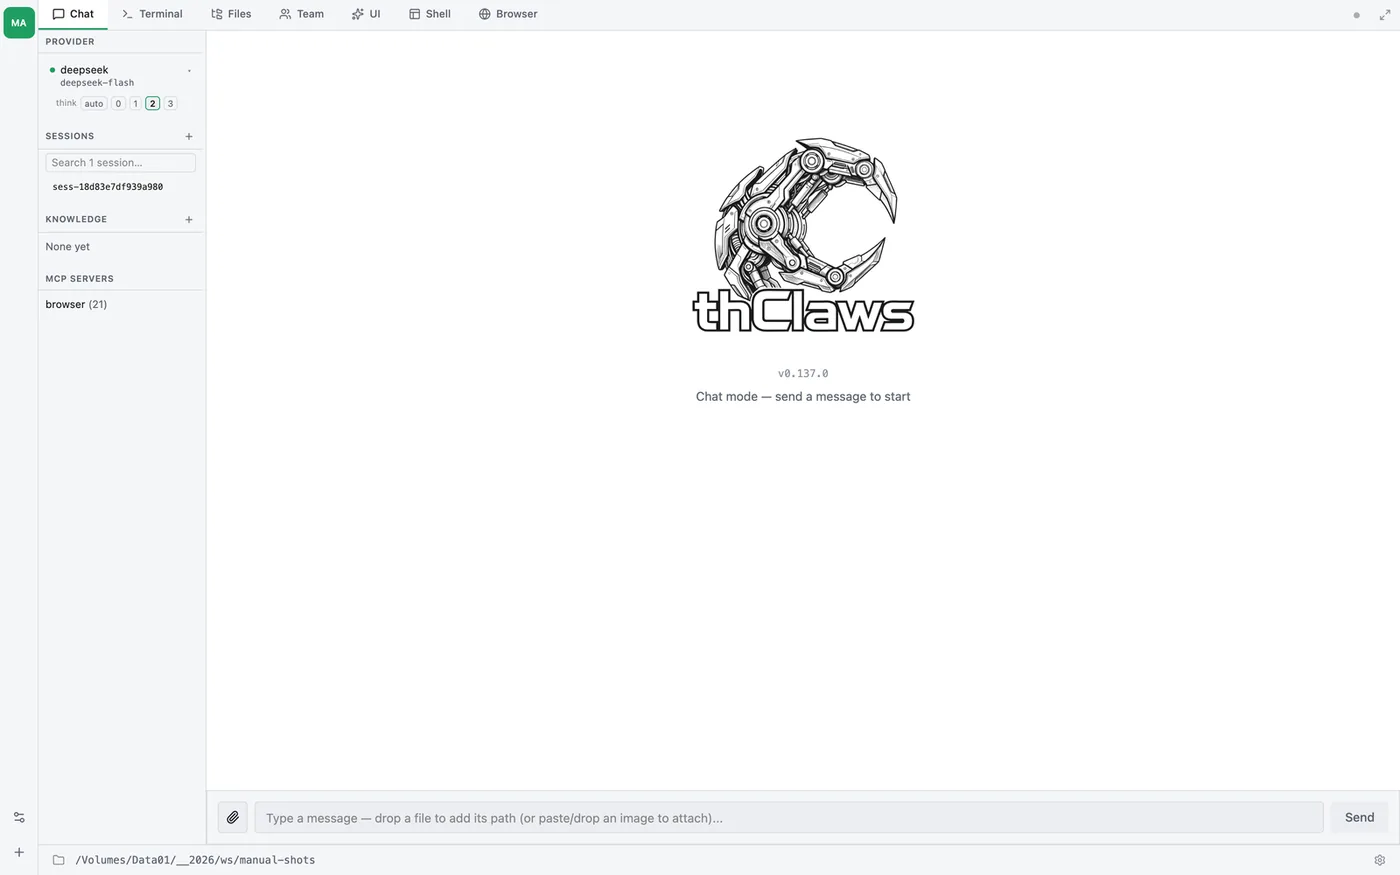
- Agent rail (far left, narrow) — one square per agent in this workspace, plus workspace settings and “add an agent” at the bottom. A workspace holds up to 8 agents; see chapter 17 for what they are. With one agent it is just the single tile, so it is easy to miss.
- Tab bar (top) — Chat, Terminal, Files, and whichever optional tabs are switched on.
- Sidebar (left column) — four sections covering active provider + model, saved sessions, attached knowledge bases, and configured MCP servers.
- Active tab content (right) — whatever tab you’re on: a streaming chat, a live terminal, a file browser, the team view.
- Status bar (bottom) — current working directory on the left, gear icon for Settings on the right.
Sidebar (left column)
The sidebar is always visible and holds four sections:
| Section | Shows | Actions |
|---|---|---|
| Provider | Active provider + model, ready/not-ready dot, ▾ chevron, and a think row |
Click the model line to open the inline model picker (v0.7.2+) |
| Sessions | A search box, then the saved sessions (title or ID) | + to start a new session · type to filter · hover row → pencil to rename · click to load |
| Knowledge | Every discoverable KMS with attach checkbox | + to create a new KMS; right-click the header to import/export OKF bundles — see chapter 9 |
| MCP Servers | Active MCP servers + their tool count | Read-only here — configure via /mcp add |
The Provider section has a visual health indicator:
- 🟢 green dot + normal text: provider ready to use
- 🔴 red dot + ~~strikethrough~~ + “no API key — set one in Settings”: provider has no credentials
When a key is saved via Settings, the dot flips to green and the active model may auto-switch to the first provider with credentials — see chapter 6.
Thinking budget — under the model line sits a think row: auto · 0 · 1 · 2 · 3. It sets how much reasoning the model is asked to spend on the next turn, without a slash command. auto lets the engine decide from the prompt; 0 turns extended thinking off; 1–3 ask for progressively larger budgets. Models that have no reasoning mode ignore it. The same control is /thinking in the REPL — see chapter 10.
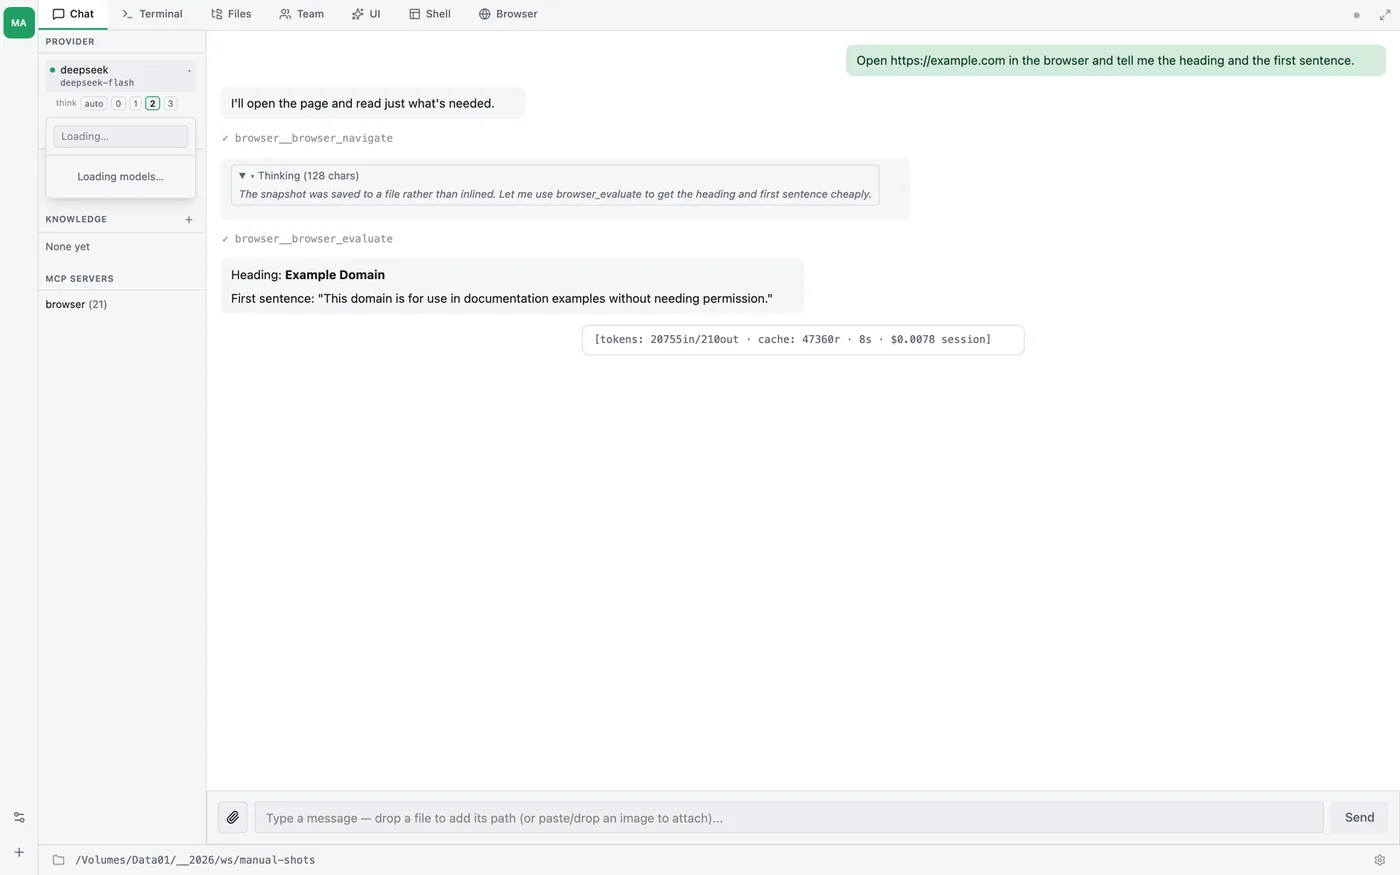
Inline model picker (v0.7.2+): clicking the Provider row opens a search-as-you-type dropdown listing every model the catalogue knows about, grouped by provider, plus any local Ollama models discovered live via /api/tags. Click a row to switch — the change persists to .thclaws/settings.json and the active provider rebuilds in place (same path as /model). Esc or click-outside dismisses without changing.
Agent rail (far left)
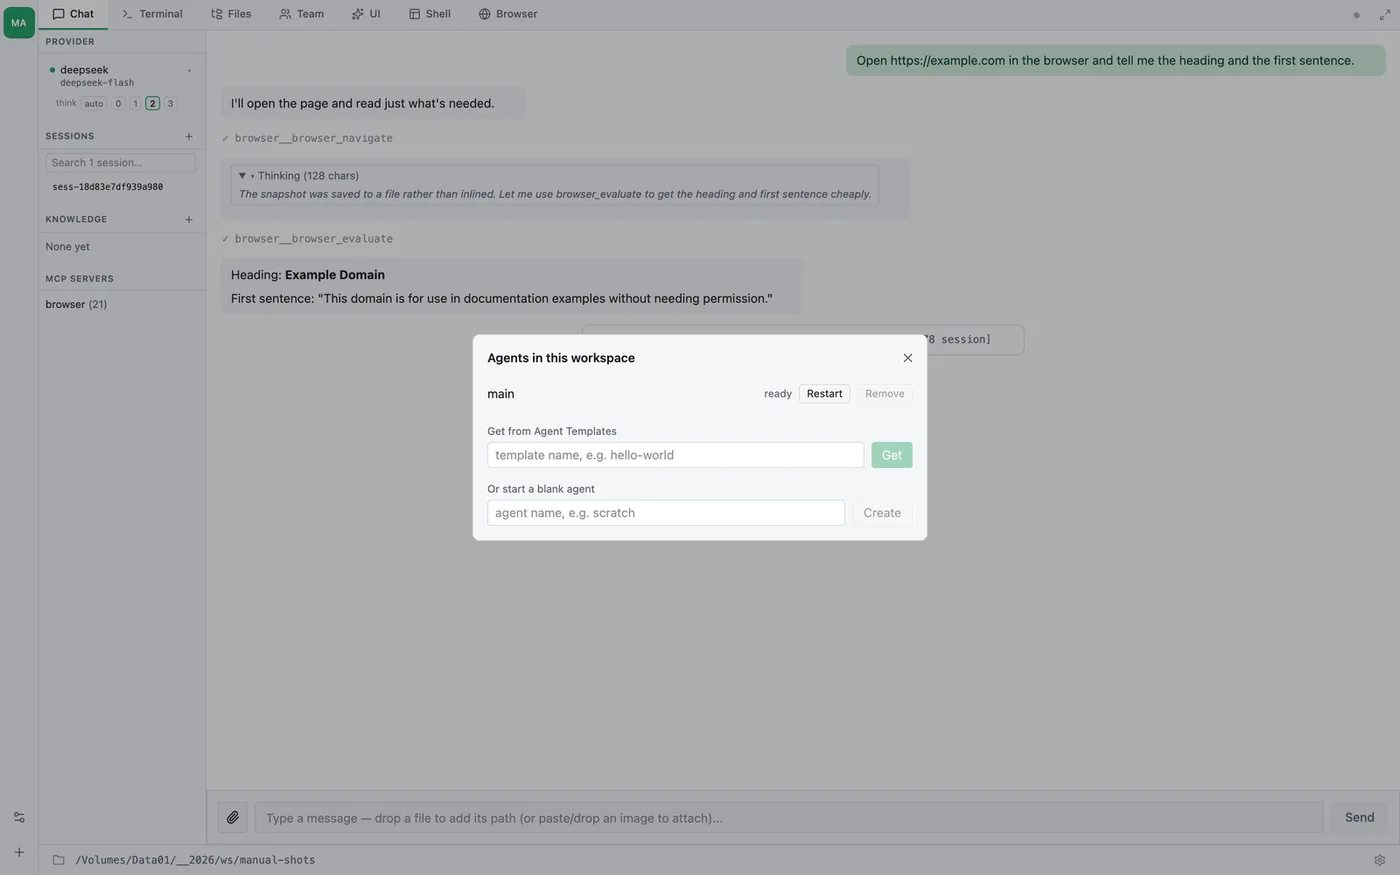
The narrow strip down the left edge is the workspace’s agent list — one
square per agent, showing its initials, with the active one highlighted.
Hovering a square names it and gives its state (main — ready).
Two buttons sit at the bottom of the rail:
| Button | Does |
|---|---|
| Workspace settings | Add, remove or restart agents in this workspace |
| Add an agent | Get an agent from an Agent Template, or create an empty one |
Every agent keeps its own conversations, sessions and settings, but they all read and write the same project files — the working directory in the status bar is shared. See chapter 17.
Right-edge sidebars (contextual)
The right side of the window hosts a set of context-sensitive sidebars that appear only when their feature is in use. Each is a fixed-width 260 px column with a chevron tab to collapse/restore and an X to dismiss.
| Sidebar | Trigger | Purpose |
|---|---|---|
| Goal | /goal start active |
Shows current goal + iteration budget + token consumption — see chapter 19 |
| Todo | TodoWrite called |
Live checklist from .thclaws/state/todos.md — see chapter 18 |
| Plan | Plan mode active | Step-by-step plan with approve / cancel / skip controls |
| Research | /research running or recent |
Iteration progress, score history, phase log — see chapter 20 |
| Background agents | /dream / /agent / /translator running |
Live elapsed time + last tool call for every side-channel agent; auto-prunes finished entries after 5 min — covered below |
| KMS browser | Click a KMS row’s title in the left sidebar | Lists pages + sources; click an entry to open the viewer overlay |
When several are active at once they stack right-to-left in this order: Goal → Todo → Plan → Research → Background agents → KMS browser. Any combination is fine.
Background agents sidebar — the inline chat bubble for a /dream (or any side-channel run) can scroll out of view during a long run; this sidebar is the persistent “is it still running?” answer. Each running entry shows ◉ + agent name + live elapsed time (1 s tick); when an agent finishes you see ✓ + total duration + (for /dream) a → dream-YYYY-MM-DD hint pointing at the summary page. Errors show ✗ + the first line of the error. Finished/errored entries linger for 5 min so you can read the outcome.
When the panel is dismissed but agents are still running, the collapsed chevron tab glows in the accent color so you don’t forget about the work in flight. Click the chevron to bring the panel back.
KMS browser sidebar — opens when you click a KMS title in the left sidebar. The file currently open in the viewer overlay is highlighted with an accent-colored left border, tinted background, and bold weight, so you can see at a glance which entry in the listing maps to what’s on screen. The highlight is scoped to the currently-browsed KMS — opening a file from KMS-A while you have KMS-B’s browser open does not light up a same-named entry in KMS-B.
Tab bar
Up to seven tabs, plus the settings gear on the right. Four are always there; three appear only when the feature behind them is switched on, so a fresh install shows Chat · Terminal · Files and nothing else.
Chat is the leftmost tab and the one a fresh window opens on.
1. Chat tab
A streaming chat panel that shares history with the Terminal tab (same agent, same session). Messages render as Markdown; tool calls show collapsible [tool: Name] blocks; token usage appears after each assistant response.
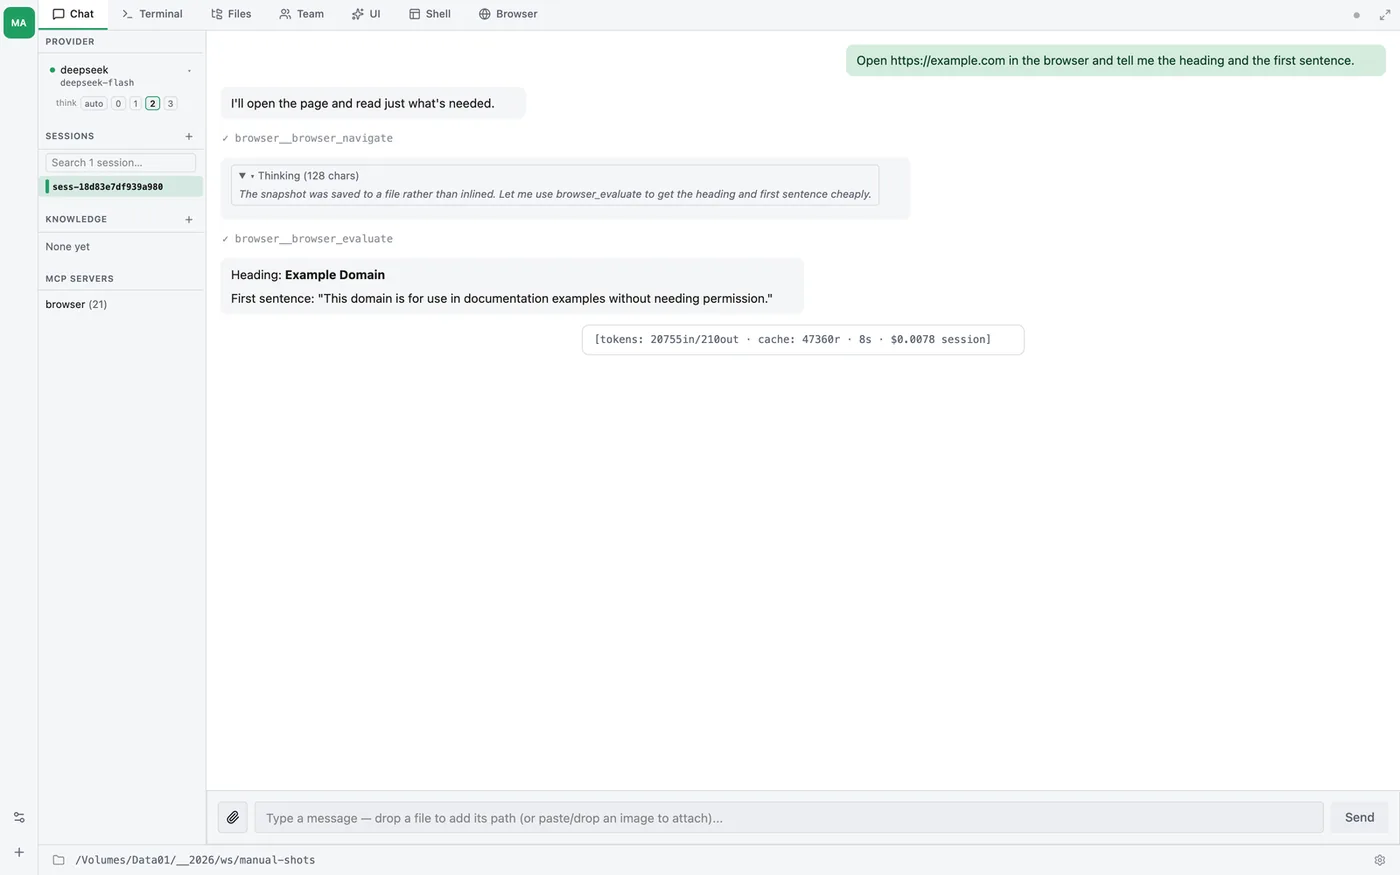
Use the Chat tab when you prefer a conversational UI; use the Terminal tab when you want to see raw output and run slash commands.
2. Terminal tab
An embedded xterm.js terminal running thclaws --cli (the same REPL you get from the CLI). Keystrokes go through a PTY bridge to the child process; output streams back via base64-encoded frames.
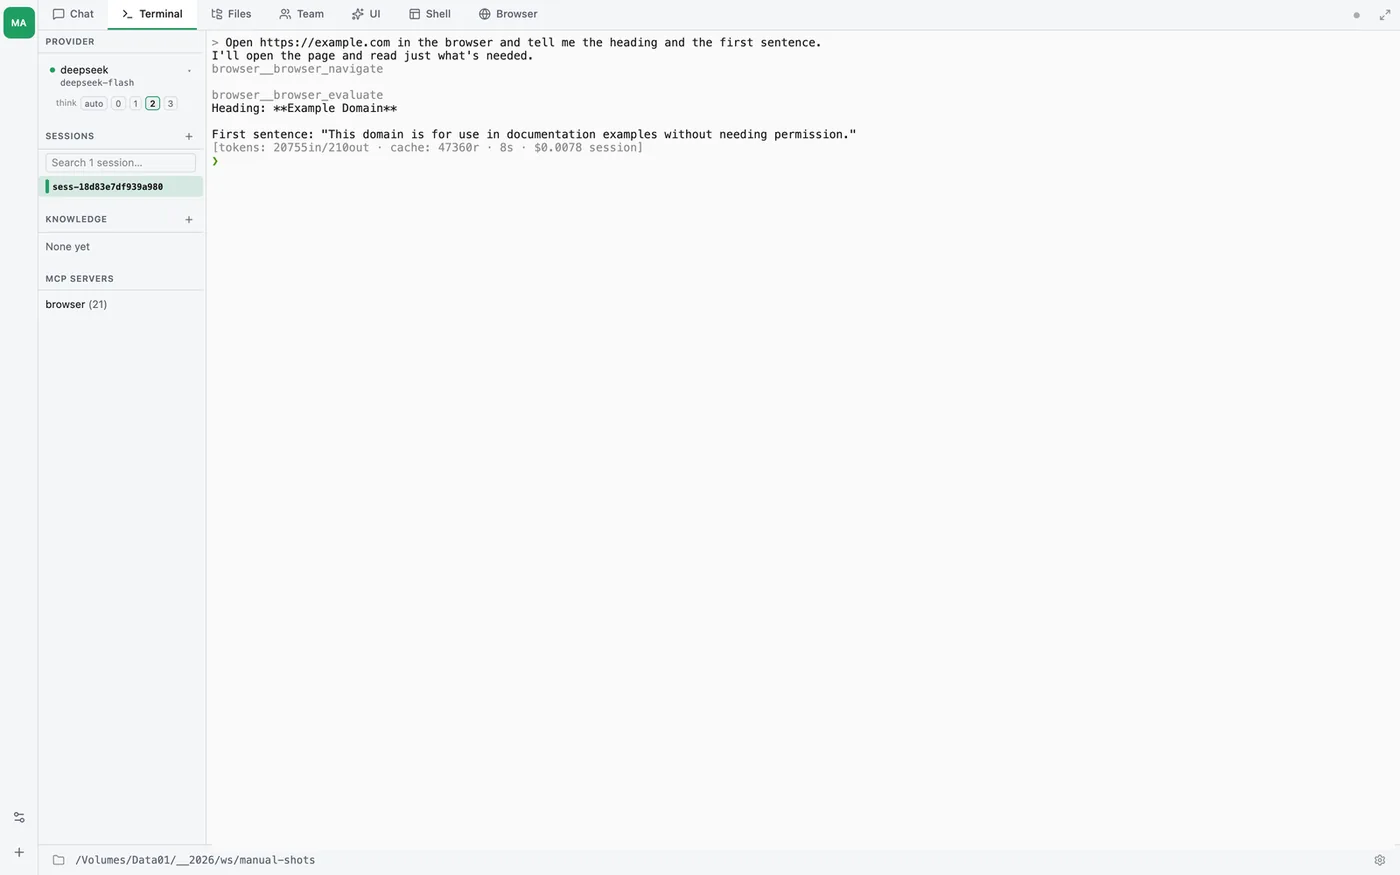
Key behaviors worth knowing:
- Copy / paste — Cmd+C / Cmd+V (macOS) or Ctrl+Shift+C / Ctrl+Shift+V (Linux/Windows). These go through a native
arboardIPC bridge because wry blocksnavigator.clipboard. - Ctrl+C is context-sensitive: if the current typed line is non-empty, it clears the line (like
Ctrl+Uin bash); if the line is empty, it passes through as SIGINT. - Resize — the terminal size follows the window, propagated via
portable-ptyresize. - Ctrl+L clears the screen.
3. Files tab
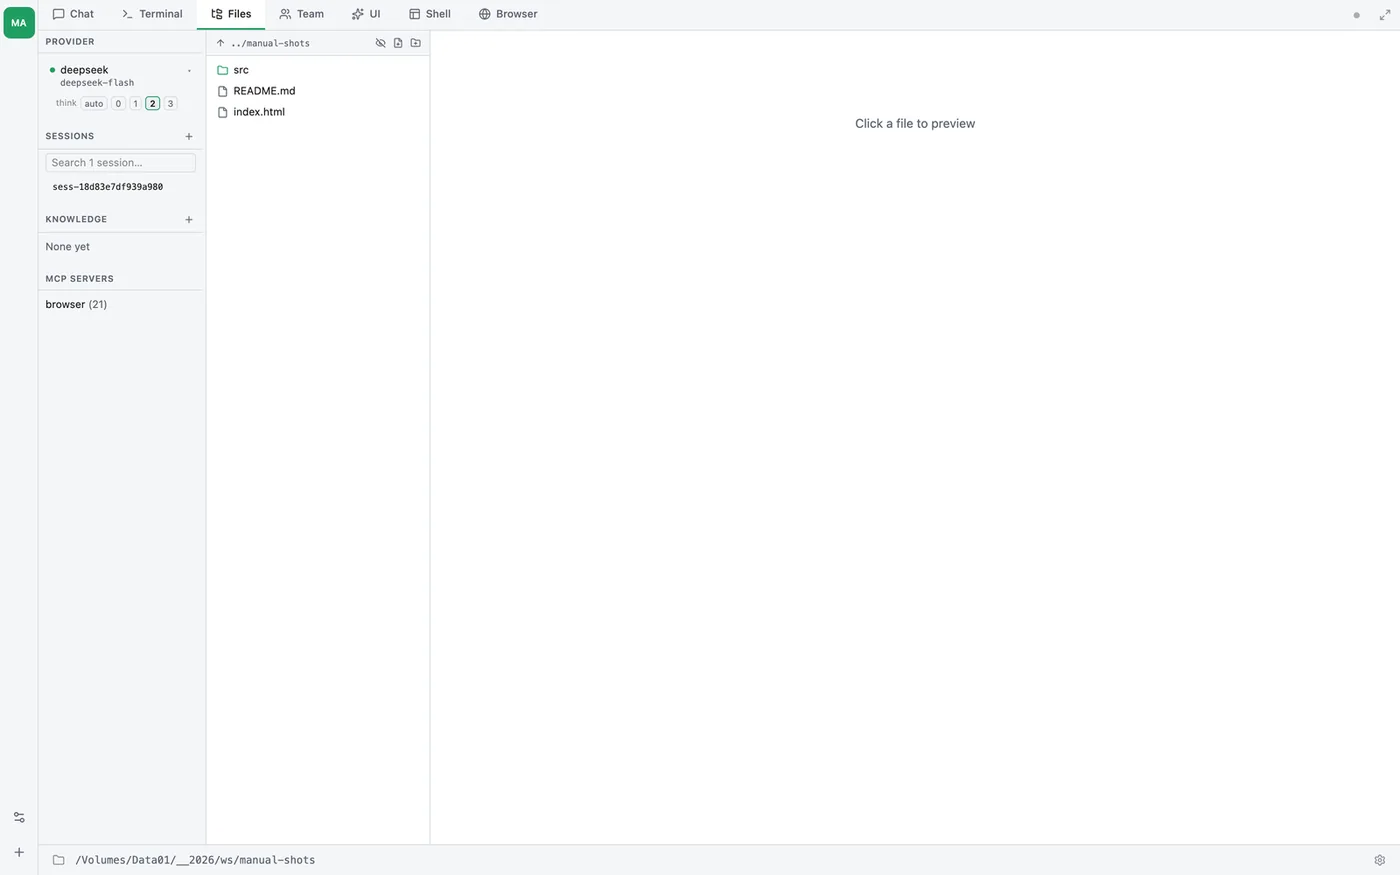
A filesystem browser rooted at the working directory. Click a file in the tree to open it in the right-hand pane; click the pencil icon next to the path to switch to edit mode.
Preview mode (default):
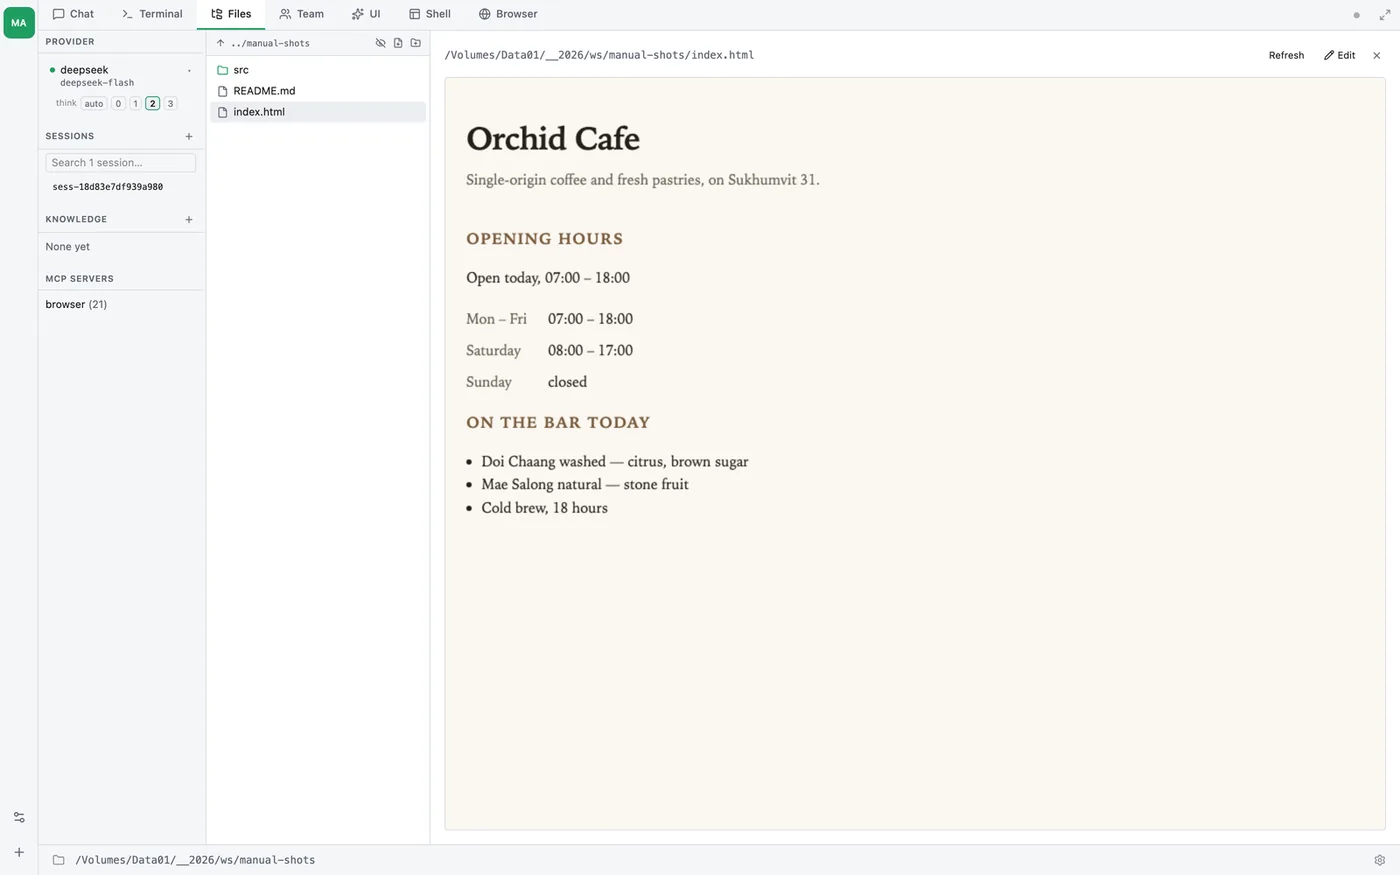
.mdfiles — rendered to HTML server-side (GFM tables, task lists, strikethrough, autolinks, footnotes), displayed in a sandboxed iframe. Raw HTML inside markdown is stripped before rendering..htmlfiles — rendered in the same sandboxed iframe.- Code files (
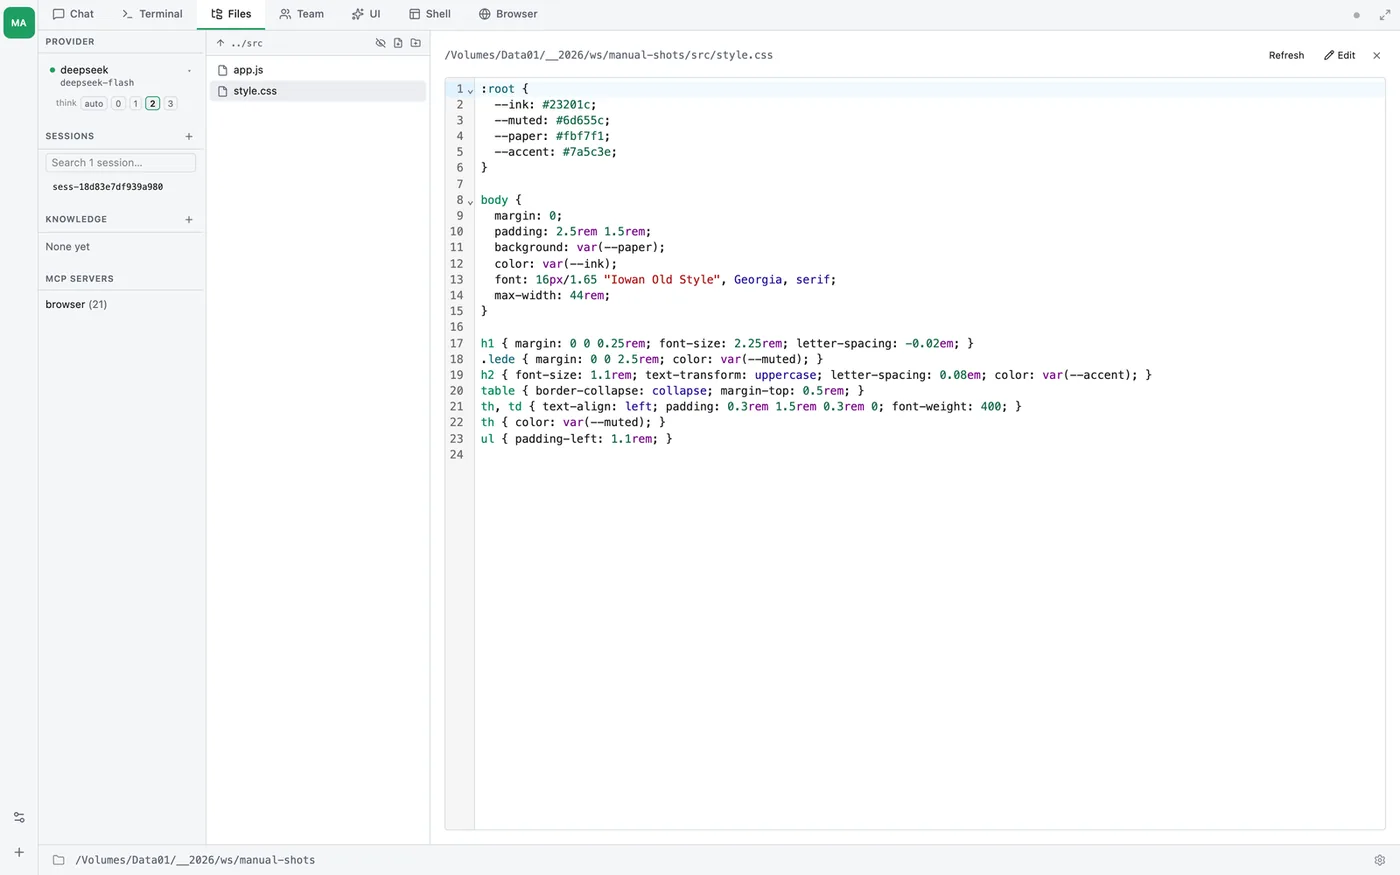
.js,.ts,.tsx,.py,.rs,.go,.java,.cpp,.php,.json,.yaml,.sql,.xml,.css, and more) — syntax-highlighted via CodeMirror 6 in read-only mode, with line numbers, bracket matching, and a search panel. - Images and PDFs — inline preview.
- Plain text / config files (
.txt,.log,.env,.conf,.ini,.toml,.sh,Dockerfile, …) — plain<pre>block.
Right-click a .md file for the KMS actions. Both archive the file
verbatim as sources/<alias>.md first; they differ in what becomes the
page:
- Add to KMS — the main agent curates the stub page into one summary (visible as a chat turn).
- Add to KMS as atomic notes — a research job (Research sidebar shows
progress) digests the whole document in ~10 k-character windows,
extracts quote-checked claims and entities, then writes the topic page
over
pages/<alias>.mdplus one note per idea linked from it — the same zettelkasten output as/research, cited to../sources/<alias>.md. Pick this for long documents you want to navigate by concept; pick the plain summary for short notes.
Source files land in CodeMirror, read-only, with line numbers and syntax highlighting; Edit in the top-right switches to edit mode:
.html files render live in the sandboxed iframe, so you see the page as a browser would — styles, images, and interactive JS intact:
Edit mode (pencil icon):
- Markdown opens in a TipTap WYSIWYG editor — the same round-tripping editor used for
AGENTS.mdin the Settings menu. - Code files open in CodeMirror 6 with per-language syntax highlighting, bracket matching, undo history, and a search panel. The language is picked from the file extension.
- A filled dot (●) next to the filename marks unsaved changes. The Save button is disabled until the buffer is dirty.
- Cmd/Ctrl+S saves. A green “saved” or red “save failed: …” toast confirms.
- Discard (shown while dirty) / Preview (shown while clean) exits edit mode. Clicking Discard pops a native OS confirm dialog (“Discard / Keep editing”) before dropping edits.
- Clicking a different file in the sidebar while dirty also pops the same native confirm — save or discard before navigating away.
- Auto-refresh polling pauses while you’re editing, so a concurrent
Write/Edittool call from the agent can’t clobber your in-progress buffer.
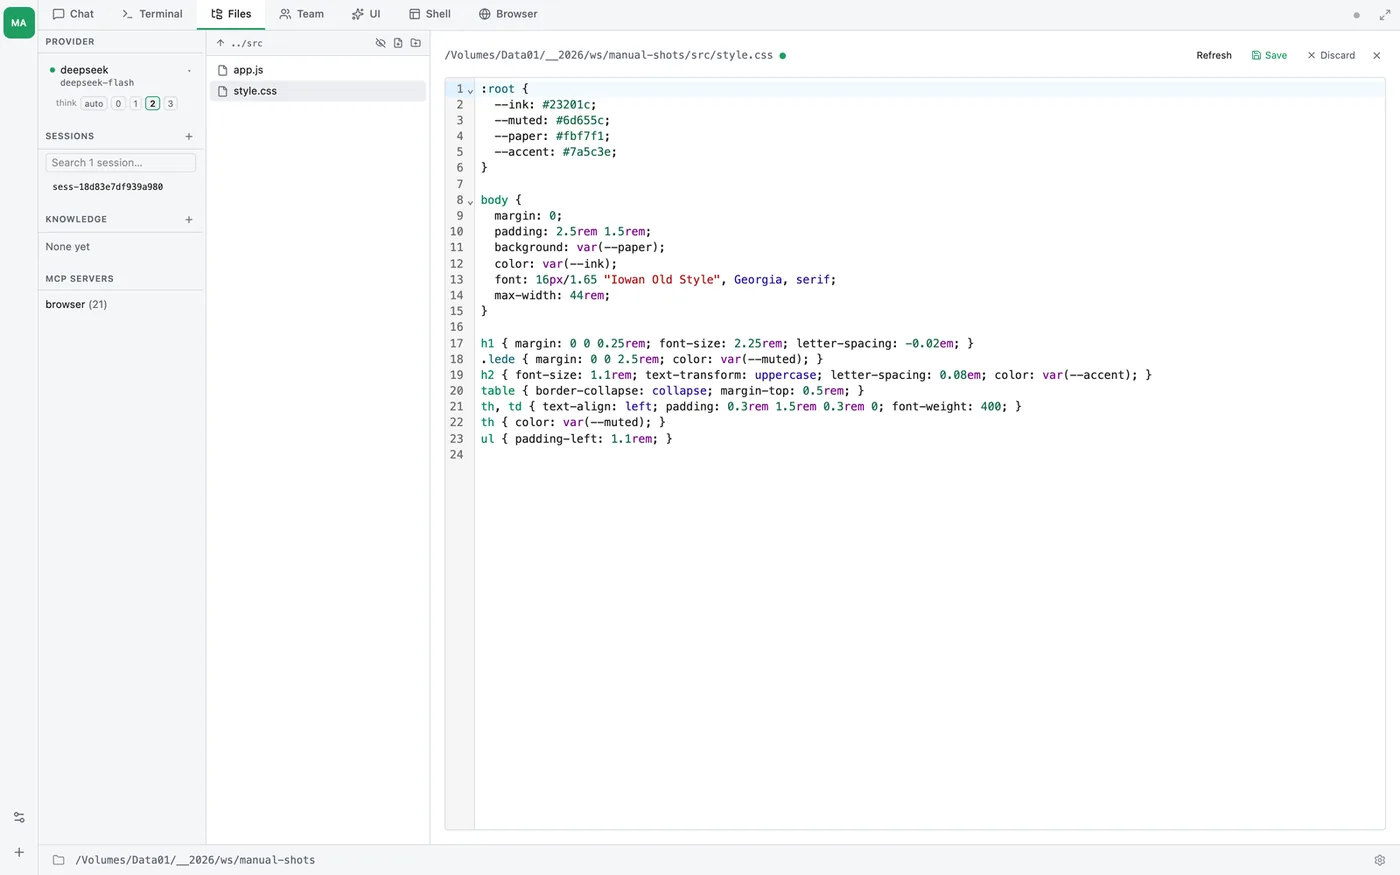
Files are written through the same working-directory sandbox the agent uses, so edits stay inside the project tree. User-initiated saves do not go through the agent approval prompt — the Save button is your approval.
Refresh button — re-fetches the file from disk and remounts the preview iframe. Use it after the agent updates a file behind the scenes (e.g. the productivity plugin’s dashboard.html regenerating its inlined task snapshot). Forces the iframe to re-render rather than relying on browser cache. Prompts before discarding any unsaved editor changes.
Dashboard host bridge — self-contained HTML dashboards opened in this tab can read and write sibling files via postMessage to the React shell, no File System Access API picker required. The productivity plugin’s dashboard.html uses this: on Refresh it re-reads TASKS.md live from the bridge (no more snapshot-staleness), and Save writes back to disk through thClaws’s file_write IPC. Any HTML page that posts {type: "thclaws-dashboard-load" | "thclaws-dashboard-save", filename, content?} to its parent works the same way.
4. Team tab
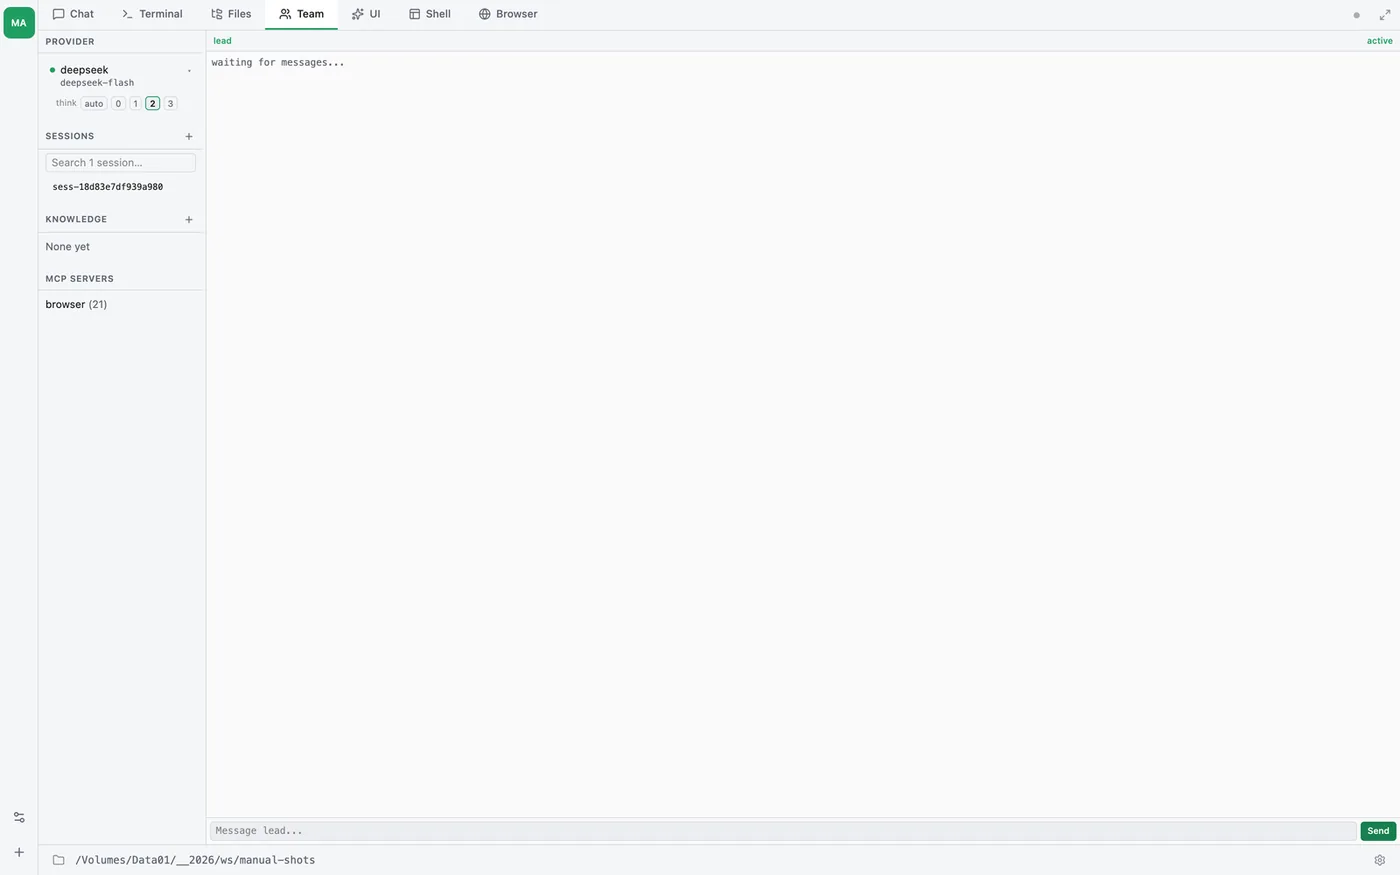
Shown only when teamEnabled: true is set in .thclaws/settings.json — the same flag that gives the agent the team tools (TeamCreate, SpawnTeammate, SendMessage, …). With the flag off there is no Team tab at all. With it on but no team yet, the tab shows an empty state (“No team agents running — ask the agent to create a team”); once the agent calls TeamCreate, each teammate gets its own pane — click a pane to focus, scroll to browse history, type into it to send input. See chapter 17 for the team concept.
5. UI tab
Shown only when a GUI Shell is installed. A GUI Shell is an
installable HTML frontend that an agent ships with itself — Media Studio
is one. The tab is a picker: choose a shell and it loads in an iframe,
talking to the engine over the window.thclaws.* bridge rather than
your conversation. See chapter 26.
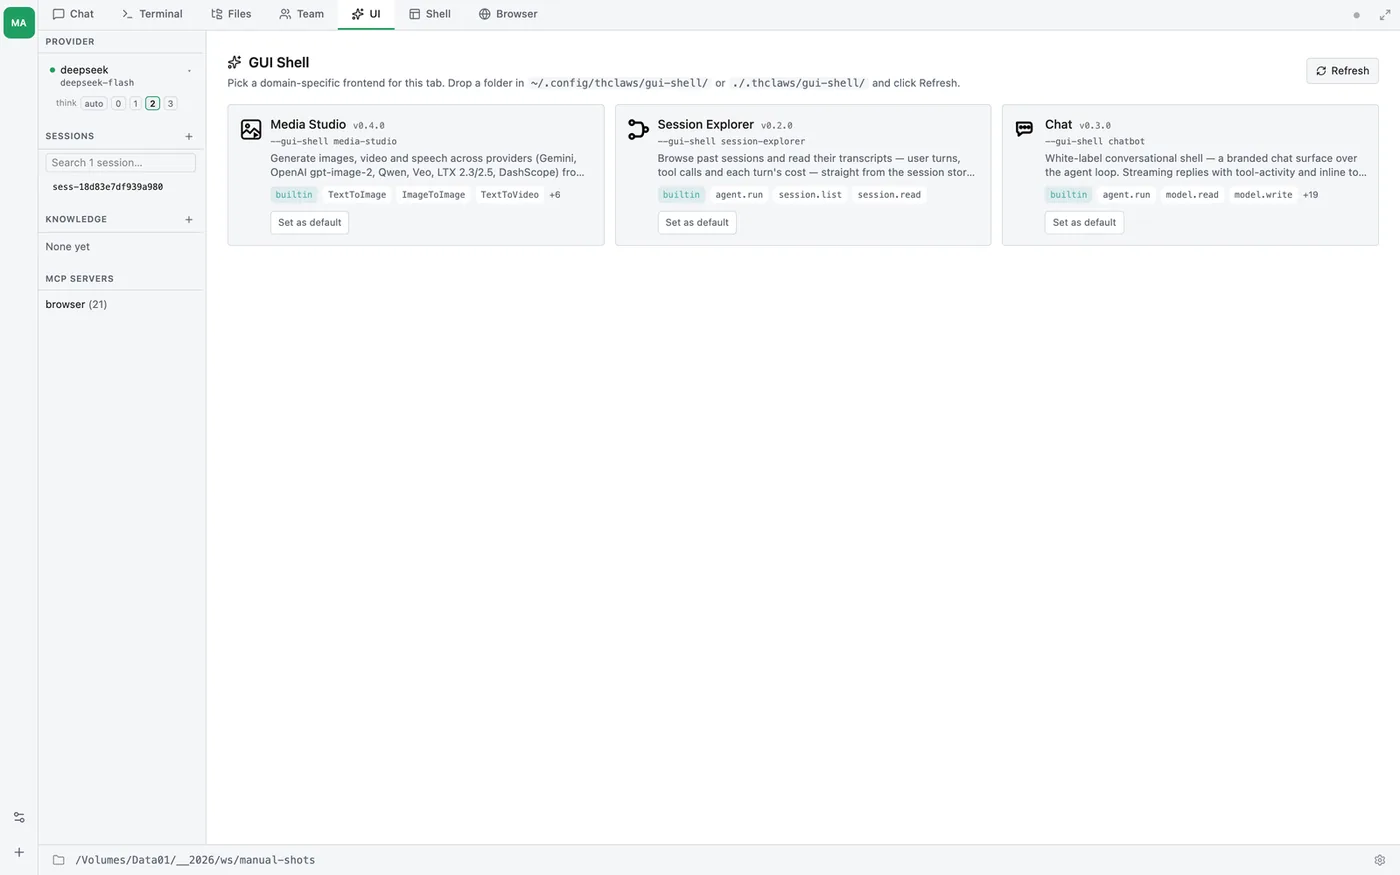
(It was called “Shell” until the PTY-backed Shell tab below took that name.)
6. Shell tab
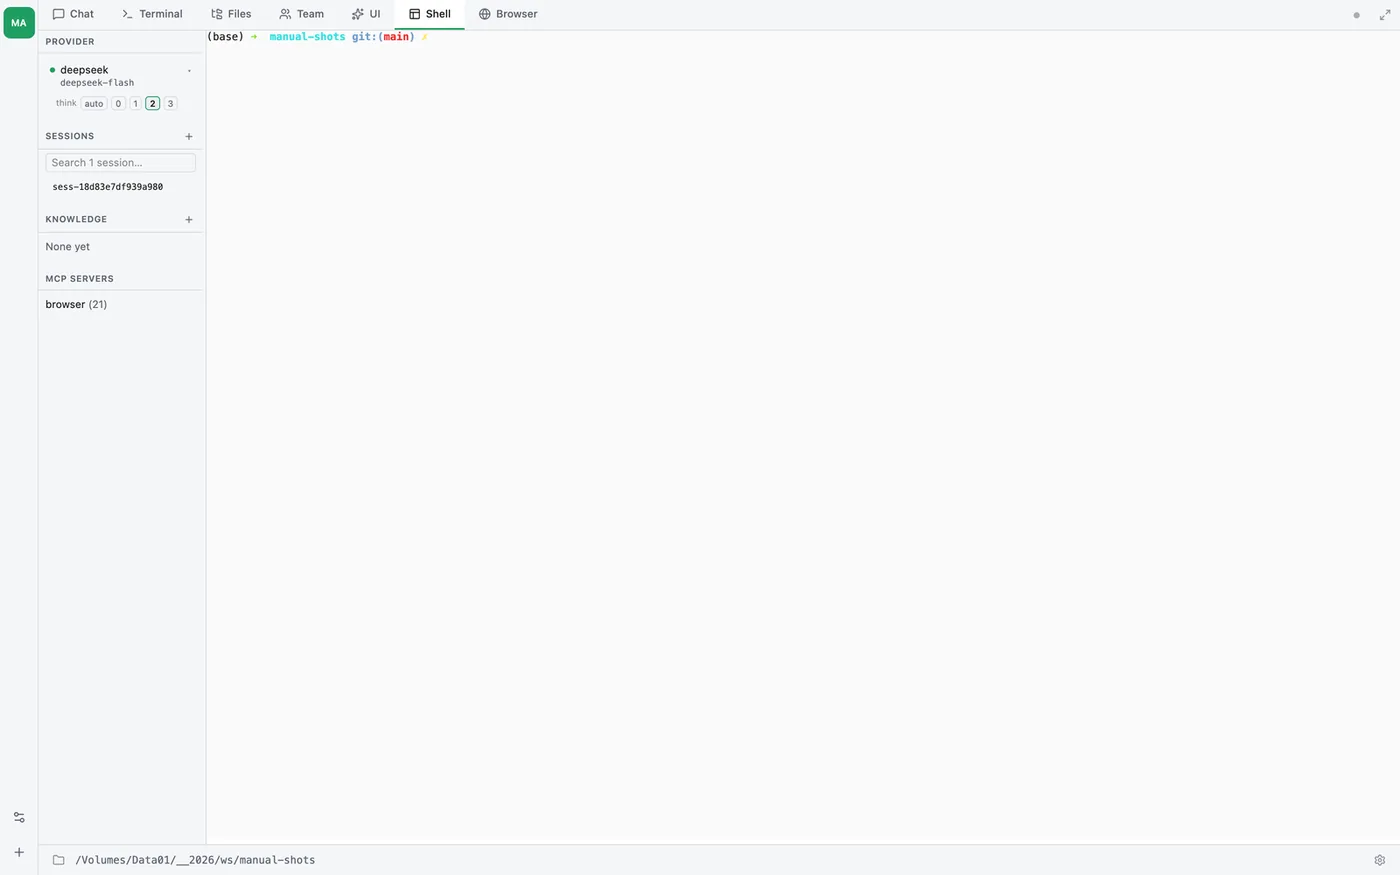
Shown only when shellTabEnabled: true — off by default. A real
terminal: it spawns your $SHELL and pipes stdio through xterm.js.
This is not the Terminal tab. Terminal is the agent’s REPL, where what you type is a prompt or a slash command. Shell is a plain shell with no agent in it — the same thing you would get from your terminal app, in a tab.
7. Browser tab
On by default since v0.49.2; turn it off under Settings → Optional features → Browser tools. Status and live activity for the Chromium instance the engine manages for browser automation.
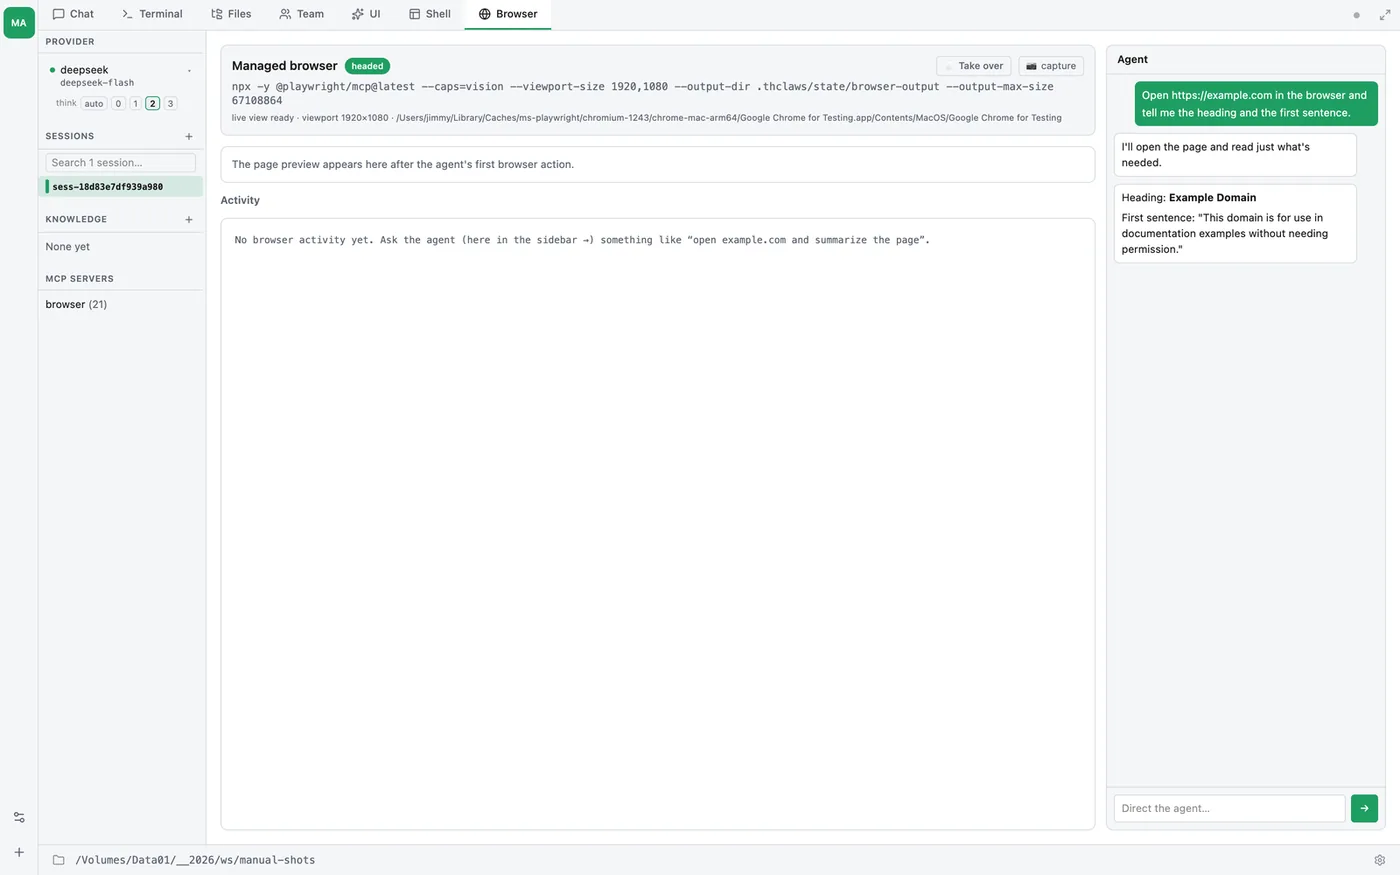
The header names the exact playwright-mcp command and Chromium
binary in use, and says whether the live view is ready. Take over
hands you the keyboard and mouse mid-run; capture snapshots the
current page. The Agent panel on the right is the same conversation
as the Chat tab, so you can steer the run without leaving the tab.
The live view needs Playwright’s own Chromium — npx playwright install
chromium. Without it the tools still work (playwright-mcp launches its
own browser) but the preview and takeover stay off. See
chapter 28.
Settings menu (gear icon)
Click the gear ⚙ on the right side of the status bar (bottom-right of
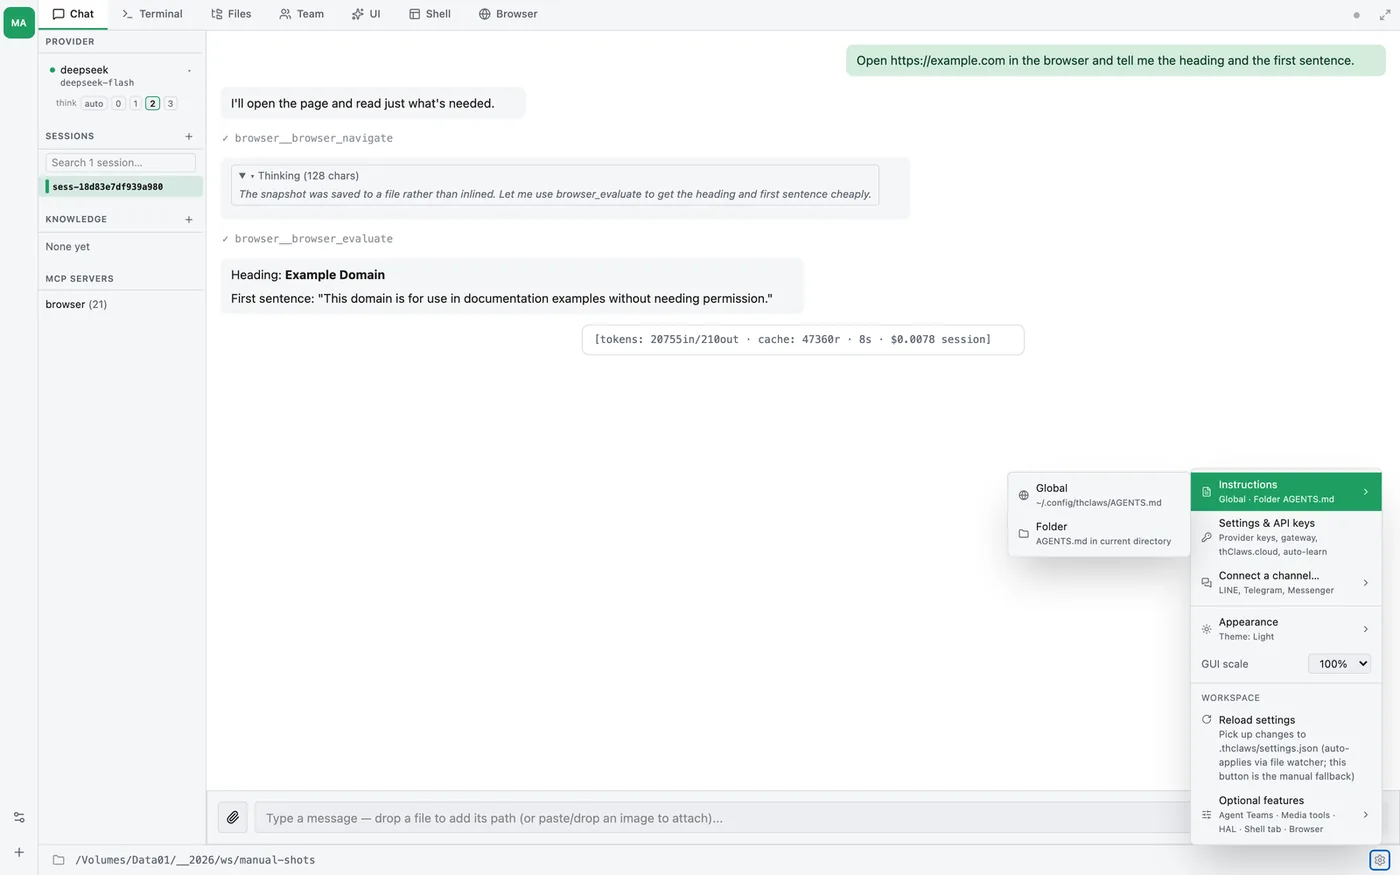
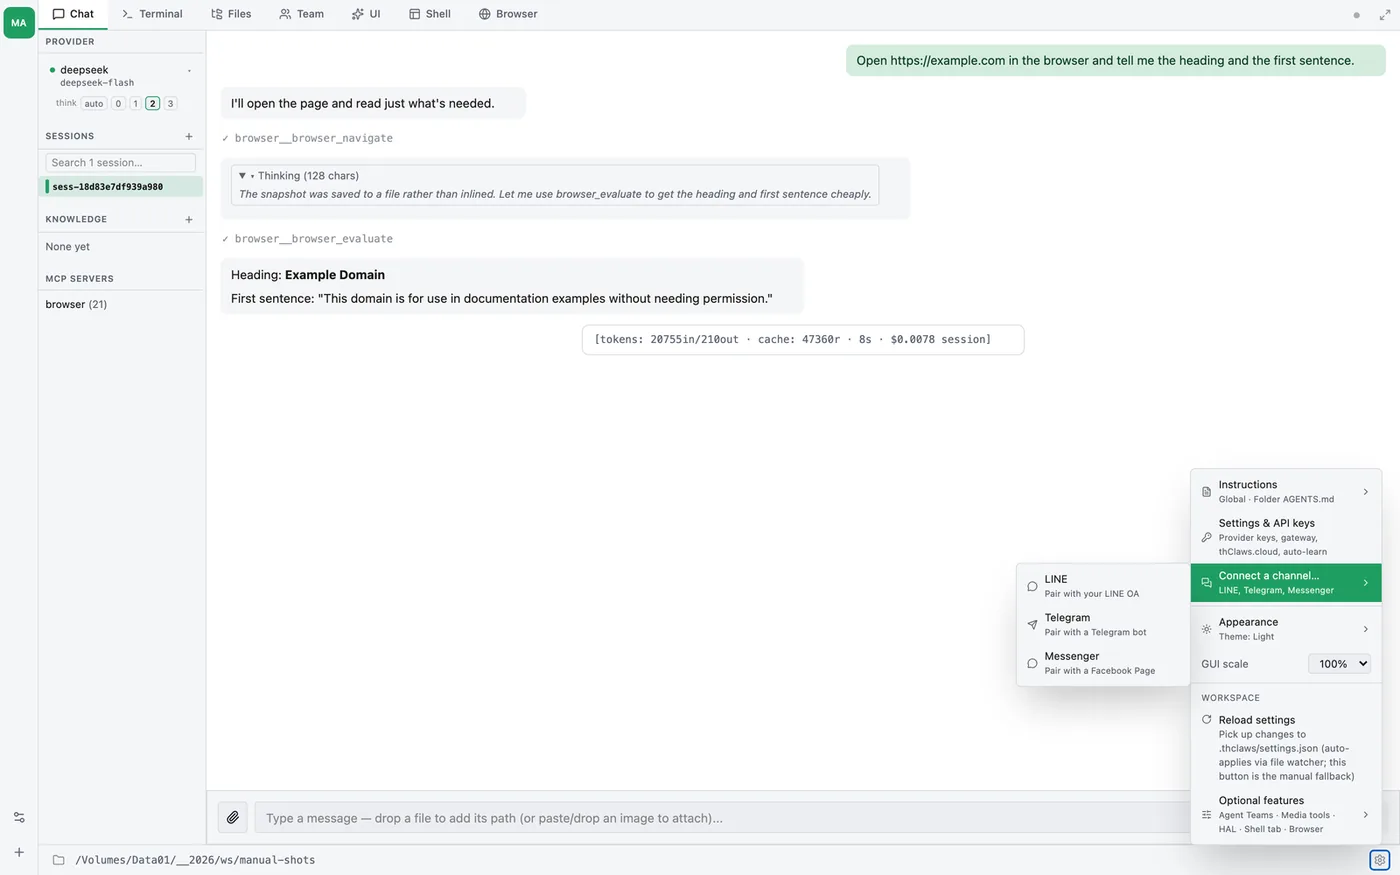
the window) to open the settings menu. Rows with a › open a submenu on
hover — clicking one closes the menu instead.
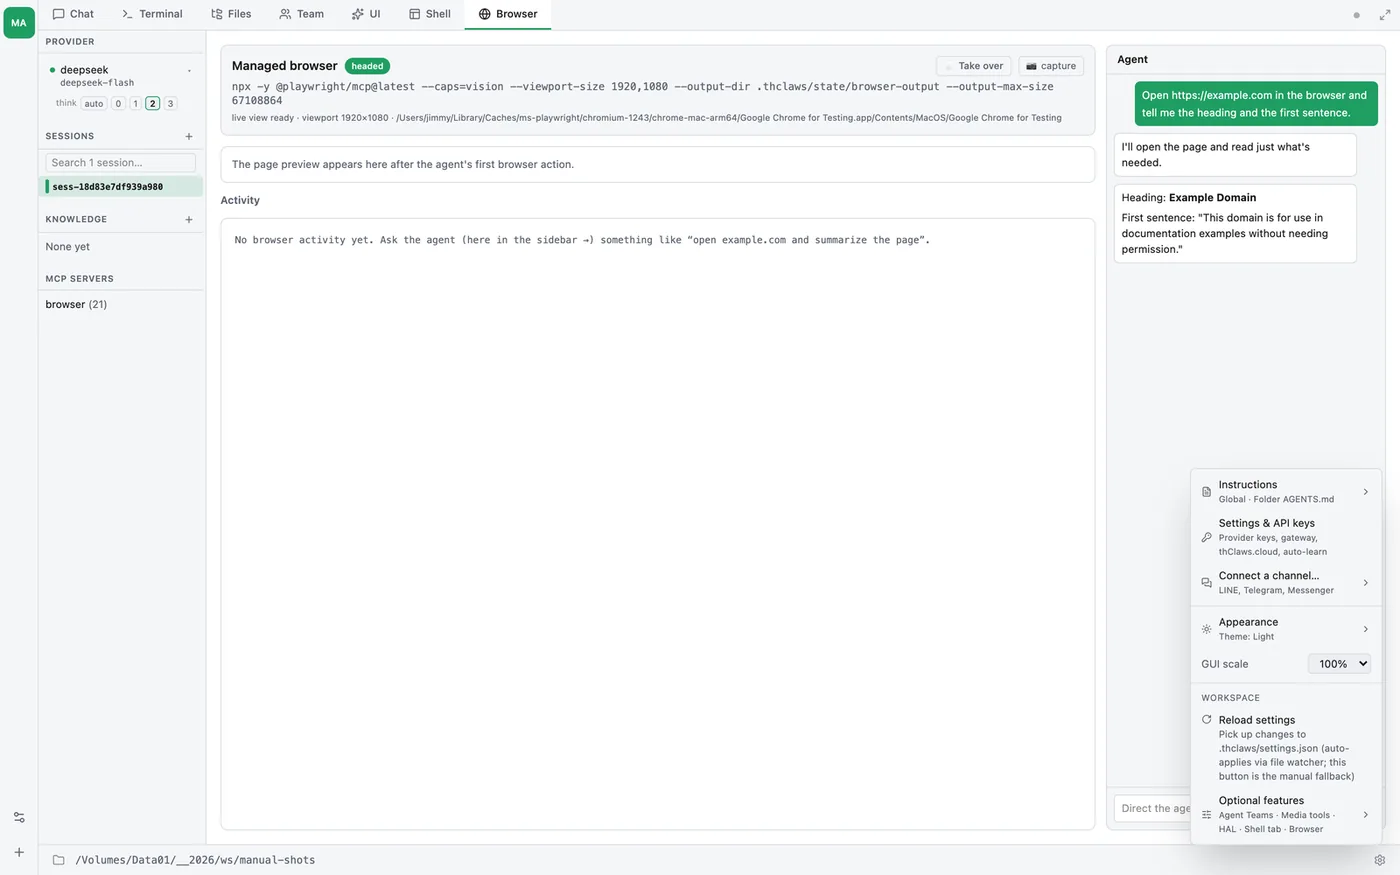
| Item | Opens |
|---|---|
Instructions › |
Global (~/.config/thclaws/AGENTS.md) or Folder (./AGENTS.md) — see chapter 8 |
| Settings & API keys | Provider keys, gateway, thClaws.cloud and auto-learn — see chapter 6 |
Connect a channel… › |
LINE, Telegram, Messenger — see chapters 21, 23, 24 |
Appearance › |
Light / Dark / System |
| GUI scale | Zoom preset, inline dropdown (75–200%) |
| WORKSPACE → Reload settings | Re-read .thclaws/settings.json by hand (a file watcher usually does it for you) |
WORKSPACE → Optional features › |
The six feature toggles, below |
Optional features
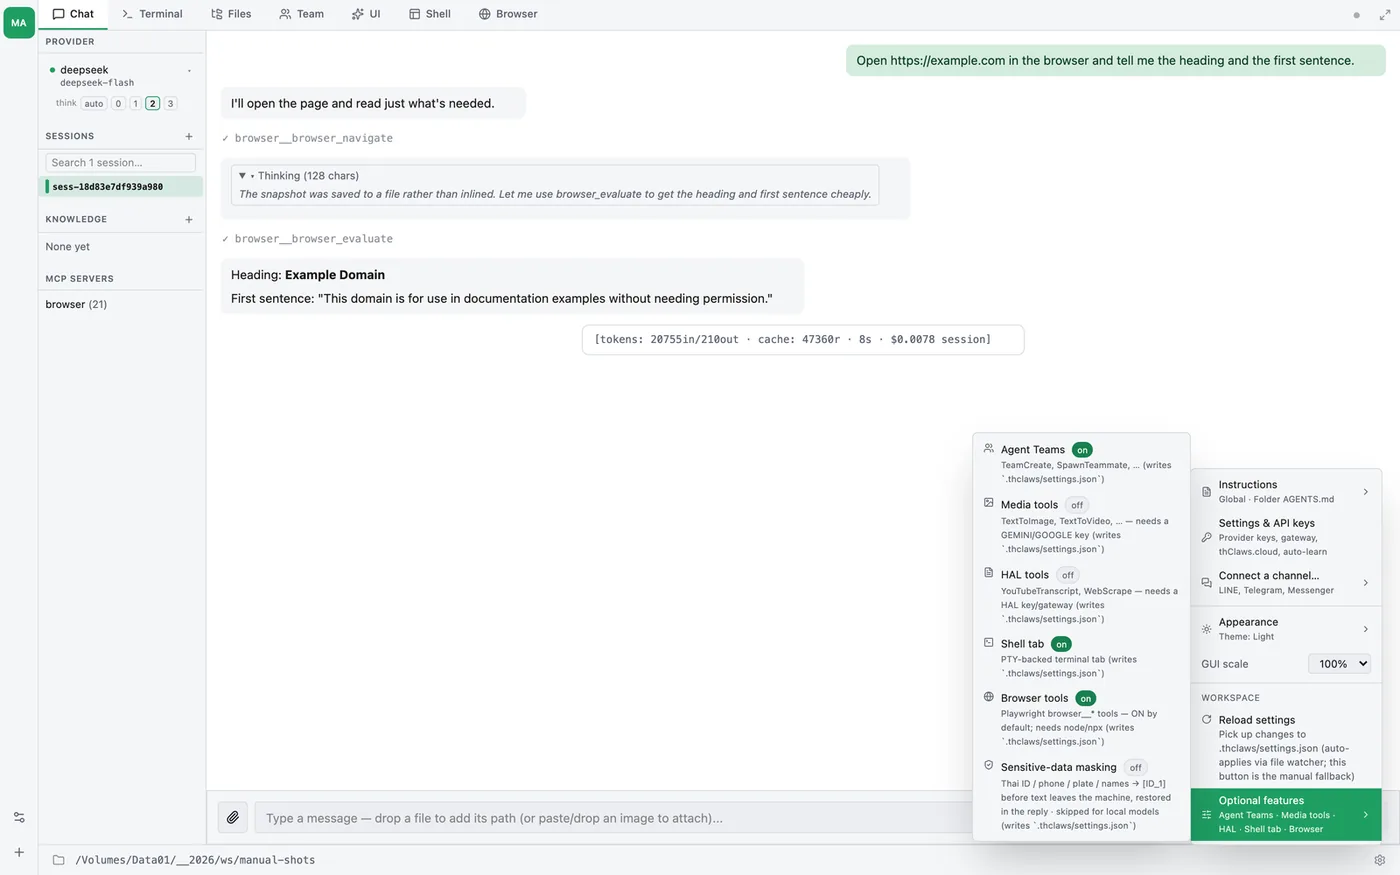
This submenu is the supported way to turn features on and off; each
toggle writes the matching key into .thclaws/settings.json, so you
never have to edit that file by hand.
| Toggle | Default | Gives you | Needs |
|---|---|---|---|
| Agent Teams | off | TeamCreate, SpawnTeammate, … and the Team tab |
— |
| Media tools | off | TextToImage, TextToVideo, … |
a GEMINI / GOOGLE key |
| HAL tools | off | YouTubeTranscript, WebScrape |
a HAL key, or the gateway |
| Shell tab | off | the PTY-backed Shell tab | — |
| Browser tools | on | the browser__* tools and the Browser tab |
node / npx on PATH |
| Sensitive-data masking | off | Thai ID / phone / plate / names leave as [ID_1] and are restored in the reply; skipped for local models |
— see chapter 32 |
A malformed .thclaws/settings.json makes every one of these read as
off with no visible error, so if a toggle refuses to stick, check that
the file is valid JSON first.
The Tiptap editor round-trips markdown through tiptap-markdown: you edit in a rich-text UI (headings, bold, lists, code fences), save to disk as markdown, and the agent reads the file on its next turn. No lossy conversion for standard Markdown.
The path shown at the top of the editor is the resolved filename so you always know exactly what you’re editing.
Appearance (Light / Dark / System)
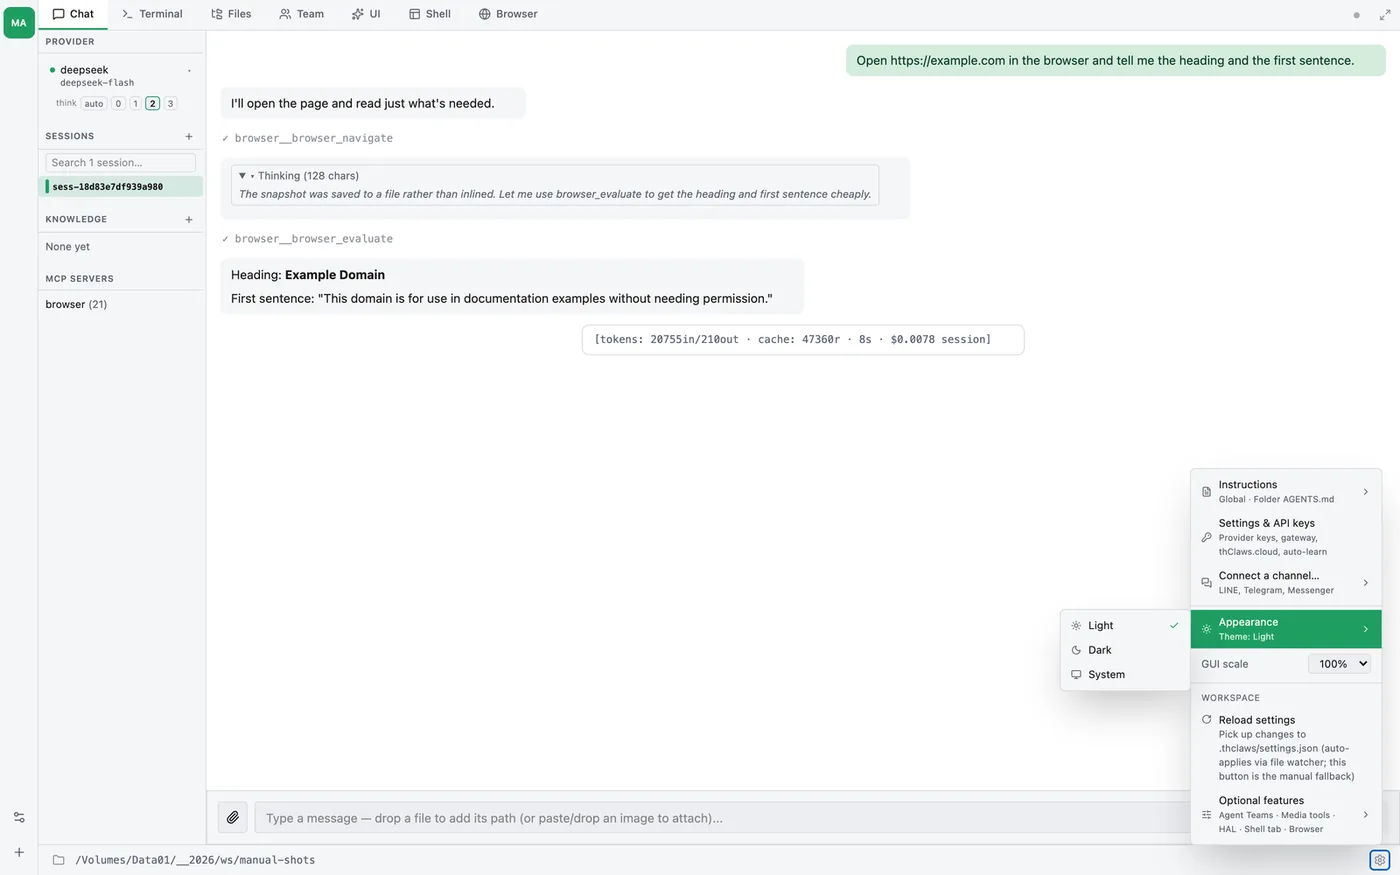
The Appearance submenu has three theme options — Light, Dark, System — each with a check next to the active one. Clicking a theme applies immediately and persists to ~/.config/thclaws/theme.json (per-user; never committed with your project). The menu deliberately stays open when you click a theme so you can try all three without reopening the gear.
Light and Dark are explicit overrides — they are honoured even if your OS is set to the opposite scheme. System follows prefers-color-scheme and flips live when the OS appearance changes (macOS Appearance, Linux DE theme, Windows personalization) without an app restart.
GUI scale (v0.7.3+)
GUI scale sits in the main menu as a dropdown of zoom presets that tunes WebView text size for HiDPI / 4K displays without changing OS-level display scaling. Pick a preset (75–200%) and the entire app scales live — Chat, Terminal, Files, Settings, sidebar — same primitive used by VS Code and Slack. The value persists per-project to .thclaws/settings.json as guiScale: <number> and is reapplied on every launch.
Use case: a 4K laptop screen at 100% Windows scaling renders thClaws text too small relative to other dev tools. Bump to 125% or 150% to match without affecting any other app.
The theme covers every surface:
- App chrome (tabs, sidebar, status bar, menus) — via CSS custom properties
- Terminal tab — xterm.js palette swaps live, scrollback preserved
- CodeMirror editor/preview — dark uses
oneDark, light uses the default highlighter - Files-tab Markdown preview — comrak re-renders with the matching palette baked into the iframe
Keyboard shortcuts
These work anywhere in the app (including the Terminal tab):
| Shortcut | Action |
|---|---|
| Cmd/Ctrl+C | Copy selection |
| Cmd/Ctrl+X | Cut selection |
| Cmd/Ctrl+V | Paste from clipboard |
| Cmd/Ctrl+A | Select all (in text inputs) |
| Cmd/Ctrl+Z | Undo (in text inputs) |
| Cmd+Q (macOS) | Quit |
Inside the Terminal tab specifically:
| Shortcut | Action |
|---|---|
| Ctrl+C | Clear line if non-empty, else SIGINT |
| Ctrl+L | Clear screen |
| Ctrl+U | Kill line (standard bash) |
Sidebar polling + cross-process updates
The sidebar polls the Rust backend every 5 seconds for config changes, so if you type /model gpt-4o in the Terminal tab, the Chat tab’s active-model display updates within 5 seconds without a restart.
When you save an API key via Settings, both the GUI and any child PTY-REPL can read the keychain entry on the next request — no need to restart either process.
Session sharing
Terminal tab and Chat tab share the same session. History scrolls together; /save in one persists both. If you load a saved session from the sidebar, both tabs reflect it.
Where things are stored
| What | Where |
|---|---|
| Window size | .thclaws/settings.json → windowWidth / windowHeight |
| Recent working directories | ~/.config/thclaws/recent_dirs.json |
| Secrets backend choice | ~/.config/thclaws/secrets.json |
| API keys (keychain mode) | OS keychain, service thclaws, account api-keys (JSON blob) |
| API keys (.env mode) | ~/.config/thclaws/.env |
| Sessions | .thclaws/state/sessions/ (project-scoped) — see chapter 7 |
| KMS (user) | ~/.config/thclaws/kms/ — see chapter 9 |
| KMS (project) | .thclaws/state/kms/ inside the working directory |
| MCP servers (user) | ~/.config/thclaws/mcp.json |
| MCP servers (project) | .mcp.json or .thclaws/mcp.json |
| Skills (user) | ~/.config/thclaws/skills/ (with ~/.claude/skills/ as fallback) — see chapter 12 |
| Skills (project) | .thclaws/skills/ (with .claude/skills/ as fallback) — project wins over plugin/user on a name clash |
| Plugins (user) | ~/.config/thclaws/plugins/<name>/ + registry ~/.config/thclaws/plugins.json — see chapter 16 |
| Plugins (project) | .thclaws/plugins/<name>/ + registry .thclaws/plugins.json |
Changing the working directory mid-session
Settings menu → “Change working directory” opens a folder picker. After you pick a new folder, the GUI:
cds the process to the new folder- Re-initialises the filesystem sandbox to match the new root (see chapter 5)
- Reloads
ProjectConfigfrom the new project’s.thclaws/settings.json— if the newmodeldiffers from the running one, the provider/agent get swapped and a fresh session is minted (the old provider’s message history can’t always reflow into a different provider’s schema; safer to start clean) - Rebuilds the system prompt (cwd is embedded in it)
- Broadcasts a line in Terminal/Chat:
[cwd] /new/path → model: X (was: Y)so you can see the swap actually happened
The contract is “project settings win” — the new project’s .thclaws/settings.json overrides every other layer (user config, env vars, the previous session’s effective config) the moment you change directory. If you don’t want a model swap on cwd change, make sure the new project’s settings.json has the same model as before.
When to use CLI instead of GUI
Use the CLI (thclaws --cli) when you want:
- SSH sessions / headless servers (no webview)
- Faster cold start (no webview initialization)
- Scripting / piping with
thclaws -p "prompt"non-interactive mode
Everything the GUI exposes is available via slash commands in the CLI — the two are peer UIs on the same engine, not parent/child.
Chapter 3 goes deeper on the working directory, modes, and command-line flags.